

*This blog post was updated on 3.19.17. Now that I’ve learned a few more tips & tricks, I thought it could use a little refresh! 🙂
Oh friends, I can’t be the only one who noticed these animated header boxes popping up all over, can I? Well, I wanted one. Who wouldn’t?! Problem was, I didn’t have the slightest fancy how to make one! I tried to search for blog posts on how to make it, but the only ones I found were far too “tech savvy” for me. I don’t have Publisher, and my Photoshop skills are limited, at best.
I pulled bits and pieces from other tutorials and YouTube videos, spent way too much time in trial and error, and figured out my own way. When I originally published this post, I used PowerPoint for everything. These days, I use Keynote for everything (both of these programs are very similar). For now, I’m going to leave the directions in PowerPoint, but if you use Keynote, follow the same steps and set up your document as 450 x 150. This is what I came up with:

I’m not going to claim perfection, but I’m definitely pleased with how it turned out! So here is my step by step for how to make it!
1. Make your images in PowerPoint (or whatever program you love)
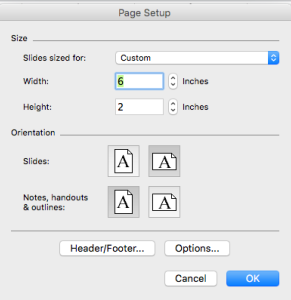
First, I made a new document and adjusted the page sizes to be 6 inch by 2 inches. I don’t know if there is a magical size, but a 3:1 ratio seemed about right, and when I tested it, it worked for me!
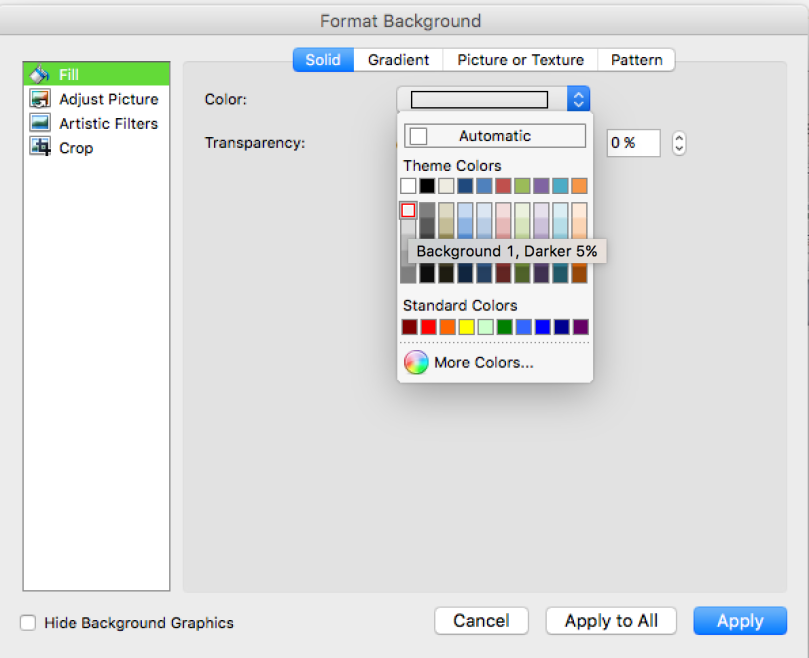
Since the TPT background is slightly gray, I played with the preset grays to get one that was close. Luckily, the very lightest gray option was a perfect fit. Go to “Format Background”, choose the lightest gray option (background 1, 5%), and click apply to all.
Then, I made each of my slides to say what I wanted them to say. I made this the same way I do a product for TPT. For the animation, I wanted a word to pop up every half second or so, so each slide had the new word added. My presentation looked something like this when I was done:

Next, I saved my images as .png (it just seems to save at a little better quality than a .jpg by clicking “Save as”, then scrolling down for the PNG option. This creates a convenient folder with each image saved separately.

After you save your images, open them up in preview and adjust the PIXELS. To do this, click on “Tools”, then “adjust size”.
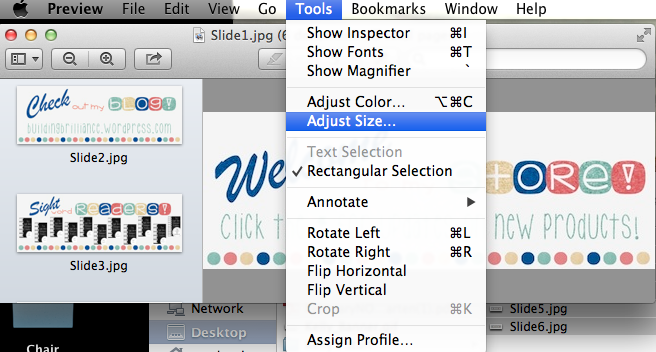
Once there, change the pixels to be 450×150. This will help it to fit in the TPT box with the correct size.

2. Create Your GIF
If you don’t have Photoshop, I recommend searching “Free GIF maker” on Google. You will have a ton of options pop up. For most of these, you will just save your images to the website, hit “create GIF” and it does all the dirty work for you. Downfall to this is that sometimes they add their own watermark to your GIF and the quality can be diminished. But, I don’t think there is a way to turn your slides into a GIF in PowerPoint.
*Note, I have Photoshop CS5, if you have a different version, it may look different*
If you have Photoshop, create a new document. Then go to File<Scripts<Load Files Into Stack. Select all the images you want in your file and upload.

Once you have all your files in Photoshop, you can start to put them together to make your GIF.
First, click Window<Animation. This will put a little bar at the bottom of your screen where you can see each image you included. 
Next, go to Select < All Layers. This will highlight all of those images that you just put into your file. 
Then, click the little 3 lined button on the Animation tab.

From there, hit “Make Frames from Layers. This will add all your pictures to that animation screen.

For whatever reason, mine like to load in backwards. It’s an easy fix, by clicking “Reverse frames.”

Last, you just have to decide how long your want each image to stay up for. I chose .5 seconds.

You are done! All you have to do is save your image and get ready to upload it. To save it as a GIF, you click File<“Save for Web & Device”. 
3. Save your GIF Online & Upload to TPT
Now that your GIF is made, head on over to Pinterest. Pick a board to upload your GIF to. I chose a private board, because really the only reason to upload it here is to be able to get a link for the next step. Click “Add Pin” and upload the GIF from your computer.

After your pin is added. Click on it, then use the control button and click “Copy Image Location” (side note, I have a Mac, if you have something else, you need to maybe right click? I don’t know for sure the answer to that. I would guess right click).

You will need your link to be smaller for the next step, so head on over to TinyURL.com to make your link shorter. Save that link. I just left my window open for easy access later.
Now go to your TPT home page. Click “My TPT”. Then click “My Account”. From there, click “Store Profile” on the left and then the “edit” button on the bottom of the page.


You will be changing the “Personal Quote” box for this step.

If you want your quote box to link to a specific page, make a tiny url for that too. You will use both this URL and the URL you made earlier from your GIF image to fill in your blanks on TpT. Use the following HTML code, substituting inside the ” ” with your codes from TinyURL.com:
<a href=”Link of whatever you want a click to take you to”><img src=”link from your GIF you made”</a>
When it is all filled in, just paste it in your personal quote box, click “edit”, and watch your animated magic appear! If it doesn’t work, retry the HTML code to make sure you don’t have spaces where you don’t need them.
I hope this tutorial was simple to follow and the pictures were helpful rather than overwhelming! I would love to hear about if this worked for you!

